

Welcome to the Captain’s Log! XO Jasmine here. Let’s get everyone settled.
When you first step onto your ship, it’s easy to see it as just a metal shell with thrusters. But, as a second-generation spacer and a huge supporter of the L.I.S.T., I know the truth: a ship is only a home if it’s filled with people. A good Captain knows their crew is their most valuable asset, and even on the frontier, there’s no reason to be uncivilized.
Your First Command is all about understanding that a crew is a family. To make that family work, you need a comfortable place for them! Managing your ship’s personnel might seem like a maze of statistics at first, but it comes down to three simple pillars. Get these right, and you’ll have a happy, productive team in no time.
The Three Pillars of a Happy Crew
Your actual maximum crew size is determined by the lowest of three values. Think of it like organizing a family dinner—you’re only as strong as your weakest link! To support your crew, you need to check these three boxes:
Let’s break down how to get these numbers up so we can get more people settled comfortably.
1. Crew Stations: The Bunks and the Bridge Seats
This is the most straightforward factor: Crew Stations are the physical places for your crew to work and rest. Every crew member needs a spot! For many of us starting out on the Frontier, the number of stations is the first thing to limit our family size.
You can increase your Stations by adding specific modules in the Ship Builder:
- Cockpits: Every cockpit provides a base number of stations.
- Hab Modules: Certain habitats are designed specifically for personnel support. For example, a “Nova Galactic control station 2×1” hab will add four crew stations.
A Quick Note from the XO: Modules with ‘Passenger Slots’ are for transport missions only and do not count toward your active, working crew. A good home needs places to work, not just places to ride!
2. Crew Capacity: The Ship’s Support System
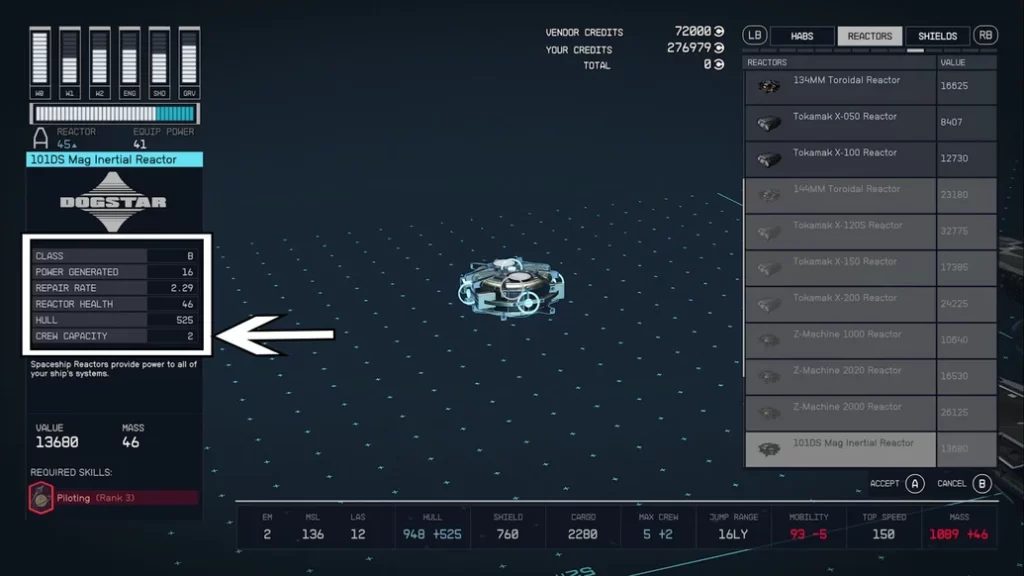
Even if you have plenty of bunks, your ship’s power grid and systems need to support the operation of a large crew. Crew Capacity is the total calculated support rating from your ship’s components.
Almost every major component adds a fractional amount to this total, representing its need for personnel:
Reactor, Engines, and Shield.
Lasers, Ballistics, and Electromagnetics (EM)
Parts like the Conduction Grid or Com Spike also contribute.
Captain’s Log: The Rounding Rule!
Remember this for your final calculation: Starfield always rounds down to the nearest whole number for Crew Capacity. So, if your total component capacity is 5.9, your final Crew Capacity is only 5.
3. Ship Command: Your Personal Leadership Limit
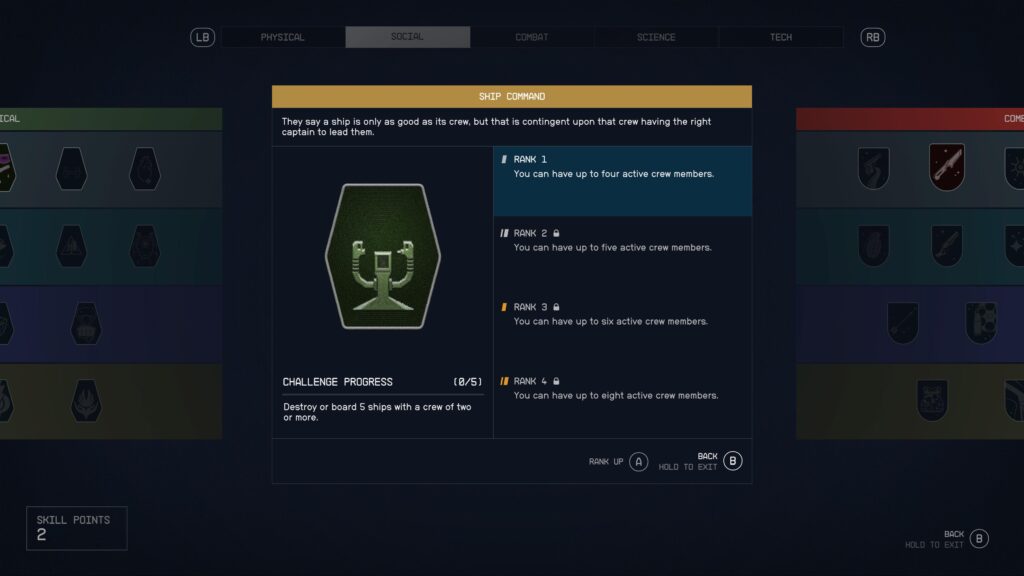
A ship isn’t just a pile of parts, ‘Scap’; it needs a Commander! Ship Command is the one limit that comes down to you—it’s a personal cap on how many crew members you can lead effectively. This skill is found in the Social tree and acts as the ultimate ceiling.
Everyone starts with the ability to command a family of three active crew members. To increase your family size, you need to invest in this skill:
Ship Command Skill Rank | Maximum Active Crew
Putting It All Together for Your Final Family Size
To determine the actual max crew for your vessel, just find the lowest value among your Crew Stations, Crew Capacity, and your personal Ship Command skill.
For example:
Your final maximum crew is 5, because the Crew Capacity is the current limiting factor. Fix the capacity, and you can invite the rest of the family!
Once you’ve done the math, you can assign your crew by opening your Character Screen, going to the ‘Ship’ section, and selecting the ‘Crew’ button.
Understanding this balance is the key to building the perfect home in the stars. Now get out there, Captain, and build a comfortable, well-supported crew!
